
Pothos propagation involves taking cuttings and placing them in water or potting soil to encourage new root growth. This process allows you to easily expand your Pothos collection without the need to purchase new plants.
Pothos, also known as devil’s ivy, is a popular houseplant known for its trailing vines and ease of care. Whether you want to propagate your Pothos to create more plants for yourself or share with friends and family, understanding the basics of propagation is essential.

One of the simplest methods of Pothos propagation is through cuttings. By cutting a healthy vine just below a node (where leaves grow), you can encourage the growth of new roots. These cuttings can be placed in water or directly into potting soil, and with time and proper care, they will develop into new Pothos plants. We will explore the different methods of Pothos propagation, including water propagation and soil propagation. We will also discuss the necessary steps and care tips to ensure successful propagation and healthy plant growth. So, let’s dive in and learn how to propagate your Pothos plants like a pro.
Methods Of Pothos Propagation
Growing your own Pothos plants can be a rewarding and economical way to expand your indoor garden. Fortunately, the methods of propagating Pothos are simple and can be easily done even by beginners. We will explore three popular methods of Pothos propagation: water propagation, soil propagation, and air layering.
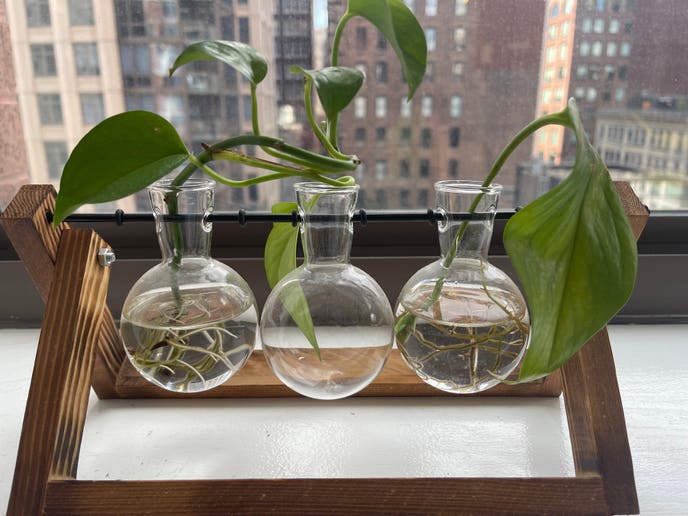
Water Propagation
To propagate Pothos in water, follow these simple steps:
- Select a healthy stem with at least two leaf nodes.
- Trim the stem right below a leaf node using clean pruning shears.
- Place the stem in a glass jar or vase filled with water, ensuring that the leaf nodes are submerged.
- Position the jar in a well-lit area, avoiding direct sunlight.
- Change the water every week to prevent the growth of algae.
- After a few weeks, you will notice roots developing from the submerged nodes.
- Once the roots reach a length of 1-2 inches, you can transfer the cutting to a pot with well-draining soil.
Soil Propagation
If you prefer to propagate your Pothos directly in soil, here’s how you can do it:
- Choose a healthy stem and cut it just below a leaf node using clean pruning shears.
- Fill a small pot with well-draining soil, making sure it is slightly moist but not waterlogged.
- Make a hole in the soil and place the cutting into it, burying the leaf node partially.
- Gently press the soil around the stem to ensure good contact.
- Place the pot in a warm and well-lit spot, away from direct sunlight.
- Water the cutting sparingly, keeping the soil slightly moist throughout the rooting process.
- Within a few weeks, roots will emerge from the buried leaf node, indicating successful propagation.
Air Layering
Air layering is a slightly more advanced but highly effective method of propagating Pothos. Here’s how you can do it:
- Identify a healthy stem and make a 1-inch long, horizontal cut with a sharp knife, approximately halfway through the stem.
- Apply a small amount of rooting hormone to the cut to encourage root development.
- Wrap a handful of moist sphagnum moss around the cut, ensuring it covers the wounded area.
- Secure the moss in place using plastic wrap or aluminum foil.
- Keep the moss consistently moist by spraying it with water regularly.
- After a few weeks, roots will start to grow from the moss-covered area.
- Once the roots are 1-2 inches long, remove the plastic wrap or aluminum foil and cut below the rooted section.
- Transfer the air-layered Pothos to a pot with well-draining soil and care for it as you would with any other Pothos plant.
By using one of these three methods, you can easily propagate Pothos and expand your collection. Whether you prefer water propagation, soil propagation, or air layering, each method is straightforward and will result in new thriving Pothos plants for your home. Choose the technique that suits your preferences and enjoy the joy of growing Pothos from scratch.
Credit: greg.app
Step-by-step Guide To Pothos Propagation
Welcome to our step-by-step guide to pothos propagation. Whether you’re a beginner or a seasoned plant enthusiast, propagating pothos is a rewarding and exciting experience. In this guide, we’ll walk you through the different methods of pothos propagation, including preparing the cutting, water propagation, soil propagation, air layering, and division. We’ll also provide tips on caring for newly propagated pothos and troubleshooting common issues. Let’s get started!
Preparing The Cutting
To start your pothos propagation journey, you’ll need to prepare a cutting from a healthy pothos plant. Look for a mature vine with at least two to three leaves and a few nodes. Using clean and sharp scissors, make a clean cut just below a node. This node is where the roots will develop later on.
Water Propagation Process
Water propagation is the simplest method for propagating pothos. Fill a clean glass or jar with water and place the cutting in it, ensuring that the node is submerged. Position the container in a bright location away from direct sunlight. Change the water every few days to prevent bacterial growth. Roots will start to emerge in a few weeks, and once they are around an inch long, you can transfer the cutting to a potting mix.
Soil Propagation Process
If you prefer a more traditional approach, soil propagation is another excellent choice. Fill a small pot with a well-draining and nutrient-rich potting mix. Insert the cutting into the soil, ensuring that the node is buried. Place the pot in a location with indirect sunlight and water it lightly. In a few weeks, you’ll notice new growth, indicating successful root development. Keep the soil slightly moist but not overly saturated, and provide regular light to encourage healthy growth.
Air Layering Process
Air layering is a unique propagation method that allows you to create a new plant while it’s still attached to the mother plant. Find a section of the vine that is flexible enough to bend without snapping. Remove the leaves from the chosen section, and make a small wound on the stem using a sharp knife. Apply a rooting hormone to the wound and wrap it with a moist sphagnum moss. Cover the moss with plastic wrap and secure it with twine or a rubber band. After a few weeks, roots will start to develop inside the moss. Once they are well-established, you can cut the stem below the rooted section and plant it in a separate container.
Division Process
If you have a well-established and large pothos plant, division is an excellent way to propagate it and create multiple new plants. Gently remove the plant from its pot and carefully separate the roots into individual sections. Ensure that each section has several healthy leaves and an ample root system. Plant these divisions into separate pots filled with fresh potting mix, and water them lightly. Place the pots in an area with indirect light and maintain slightly moist soil. In a few weeks, the new plants will start to show signs of growth.
Caring For Newly Propagated Pothos
Once your pothos cuttings have successfully developed roots and new growth, it’s important to provide them with proper care. Place the new plants in a well-lit area with indirect sunlight. Water them regularly, allowing the soil to dry slightly between waterings to avoid overwatering. Maintain a consistent temperature and humidity to promote healthy growth. As the plants continue to grow, you can start fertilizing them with a balanced houseplant fertilizer to provide the necessary nutrients.
Common Issues And Troubleshooting
While pothos propagation is generally straightforward, you may encounter some common issues along the way. Here are a few problems you may encounter and how to troubleshoot them:
- Poor Root Development: If your cutting is not forming roots, check the temperature and humidity levels. Ensure that the cutting is receiving sufficient warmth and moisture.
- Yellowing Leaves: Yellow leaves may indicate overwatering or low light conditions. Adjust your watering routine and move the plant to a brighter location.
- Pests: Keep an eye out for common houseplant pests such as spider mites or mealybugs. Treat them with an organic insecticidal soap or neem oil.
- Weak Growth: Weak growth may be a sign of insufficient light or nutrient deficiency. Move the plant to a brighter area and fertilize it regularly.
By following these steps and troubleshooting tips, you’ll be well on your way to successfully propagating pothos and expanding your plant collection. Enjoy the journey and the satisfaction of watching your pothos thrive!
Conclusion
To conclude, pothos propagation is a simple and rewarding way to expand your collection of these beautiful plants. By following the steps outlined in this blog post, you can successfully propagate your pothos cuttings and enjoy the satisfaction of watching them grow into new plants.
Remember to provide the right conditions and care for your cuttings, and soon you’ll have a thriving pothos jungle in your home. Happy propagating!
Frequently Asked Questions For Pothos Propagation
How Do You Propagate Pothos Plants?
To propagate Pothos plants, you can cut a vine just below a leaf node and place it in water until roots form. Alternatively, you can directly place the cutting in moist soil. Keep it in a warm, well-lit area and water regularly until the plant establishes itself.
Can Pothos Be Propagated In Water?
Yes, Pothos can be easily propagated in water. Simply cut a vine just below a leaf node and place it in a container filled with water. Make sure to change the water every few days and keep it in a well-lit area.
Once roots have formed, you can transfer the cutting to soil.
How Long Does It Take To Propagate Pothos In Water?
It usually takes around 4 to 6 weeks for Pothos cuttings to develop roots when propagated in water. During this time, make sure to change the water regularly, provide sufficient light, and keep the temperature consistent. Once the roots have formed, you can transfer the cutting to soil for further growth.